Pro Tools is one of the most popular DAWs available. Avid recently updated their product line to include two versions, Studio and Ultimate that unlock the configuration and routing settings required for higher order ambisonics. You can learn more about the different Pro Tools software options on Avid’s website and if you don’t already have Pro Tools, you can download a free 30-day trial version.
When using Spatial Mic USB with Pro Tools, you will want to setup the hardware as shown in the steps below. Unless your configuration changes you won’t have to do this every time you use Pro Tools.
We created a Spatial Mic USB Pro Tools I/O Template, so you can quickly import the I/O routing settings. These settings were created with the assumption you will use Spatial Mic USB as the audio input and output device. You can customize the configuration to include other hardware devices as desired.
If you are using Windows 10, be sure you have downloaded and installed the ASIO4ALL audio driver before continuing.
You will also need to download and install the latest Spatial Mic Converter Plugin from our Downloads page.
Windows Hardware Setup
Launch Pro Tools.
Step 1: Go to Setup > Playback Engine & set this to ASIO4ALL.


Step 2: Go to Setup > Hardware

Select Launch Setup App for ASIO4ALL and turn on the inputs and outputs for Spatial Mic as seen below. It is recommended to turn off any additional unused audio devices.

macOS Hardware Setup
Launch Pro Tools.
Step 1: Go to Setup > Playback Engine & set this to Spatial Mic


Step 2: The sample rate and bit depth of Spatial Mic will change automatically to match the sample rate and bit depth of your Pro Tools session but to confirm these settings on Spatial Mic you can go to Setup > Hardware

Select Launch Setup App which will open the Audio MIDI Setup App. There you can see the sample rate and bit depth of Spatial Mic. If you try to change the settings in Audio MIDI Setup a settings mismatch warning window will pop up in Pro Tools.

I/O Setup
Step 1: Go to Setup > I/O

Here you can either import the I/O settings provided in this ZIP file and skip to step 4, or you can continue through these steps.
On the Input tab, click on Default for the Spatial Mic Inputs to populate.
Next click on the New Path button. Select a new 7.1 input and select Create.

Route the inputs to Analog 1-8 as shown below.

Step 2: Select the output tab and click on the Default button.

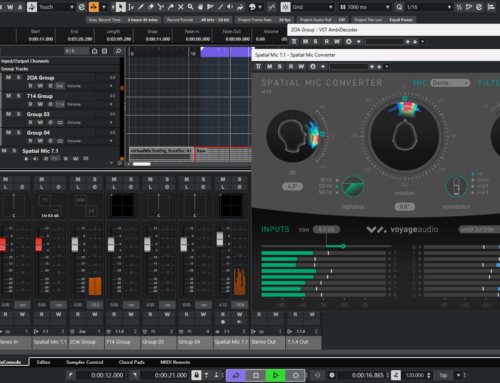
Step 3: Select the Bus tab. In the screenshot below (make the image larger by clicking on it) we show a number of different routing options you can use depending on how you are working with the audio from Spatial Mic. Add new bus paths and copy the routing below. When you are finished click the OK button.

Step 4: Go to Track > New… and create a new 7.1 track (there are 8 capsules in Spatial Mic so you have eight streams of audio).

Step 5: Set the track’s input to be Spatial Mic (7.1).

Step 6: From the Mix window add the Spatial Mic Converter Plugin to the track as an insert.

Step 7: Set the track’s output to be 7.1 to SOA Bus.

You are now setup and ready to record. From here you can record enable and see the meters move on the track, along with the Spatial Mic Converter Plugin. This can help verify you have audio streaming from the mic.
Your next step will be to route the SOA bus depending on what you plan to do with the audio. For example, you could create a new 20A Ambisonic track and have the input be the SOA bus, or you could add binaural plugins to monitor the output on headphones.
Happy Recording and exploring the many options available as you record in 3D!