Cubase has come a long way from its first release as a MIDI sequencer in 1989 and it continues to stay ahead of the curve with spatial audio tools. Cubase Pro 11 is the current version that unlocks the configuration and routing settings required for higher order ambisonics. If you don’t already have Cubase Pro, you can download a free 30-day trial version from Steinberg’s website website. Please note that in order to use Cubase Pro or the trial version you will need an USB-eLicencer. If you don’t already own a USB-eLicenser, you can get one from the Steinberg Online Shop or from your local dealer.
When using Spatial Mic USB with Cubase Pro, you will want to setup the hardware as shown in the steps below. Unless your configuration changes you won’t have to do this every time you use Cubase Pro.
We created a Spatial Mic Cubase Pro Template, so you can quickly import the I/O routing settings and start recording. These settings were created with the assumption you will use Spatial Mic USB as the audio input and output device. You can customize the configuration to include other hardware devices as desired.
If you are using Windows 10, be sure you have downloaded and installed the ASIO4ALL audio driver before continuing.
You will also need to download and install the Spatial Mic Converter Plugin: https://voyage.audio/downloads/
Windows Hardware Setup
Launch Cubase Pro.
Step 1: Go to Studio > Studio Setup…

In the Audio System window set the ASIO Driver to ASIO4ALL.

Step 2: Select the ASIO4ALL page underneath Audio System and click on the Control Panel button. Turn on the inputs and outputs for Spatial Mic USB as seen below. It is recommended to turn off any additional unused audio devices.

After you close the Control Panel the I/O ports should have eight Spatial Mic inputs and two Spatial Mic outputs as seen below. If the ‘state’ of the inputs or outputs are inactive don’t worry, we will activate them in the I/O setup.

Mac Hardware Setup
Launch Cubase Pro.
Step 1: Go to Studio > Studio Setup…

In the Audio System window set the ASIO Driver to Spatial Mic.

Step 2: Select the Spatial Mic page underneath Audio System. Here you can confirm the I/O ports have eight Spatial Mic inputs and two Spatial Mic outputs as seen below. If the ‘state’ of the inputs or outputs are inactive don’t worry, we will activate them in the I/O setup. Clicking on the Control Panel button you can adjust the buffer size if needed.

I/O Setup
Step 1: Go to Studio > Audio Connections (F4).

On the Inputs tab click on the Add Bus button. Set the configuration to be 2nd Order Ambisonics and select the Add Bus button to create the input bus.

Next route the device ports to the correct inputs as seen below. Bus 0 goes to Spatial Mic 1, Bus 1 goes to Spatial Mic 2, Bus 2 goes to Spatial Mic 3, etc… Note: Bus 8 is left as Not Connected on purpose.

Step 2: On the Outputs tab add a Stereo Out bus and route the Devices Ports to Spatial Mic 1 and Spatial Mic 2. Next add a 2nd Order Ambisonics Out Bus and leave the connections as ‘Not Connected’ as seen below.

Step 3: Go to Project > Add Track > Audio.

Set the Configuration to 2nd Order Ambisonics, the Audio Inputs to 2nd Order Ambisonics in Bus, and the output to Stereo Out, then select Add Track.

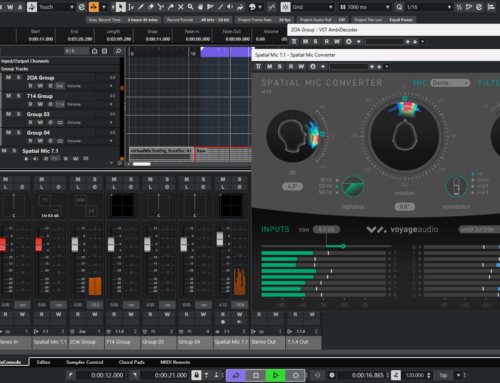
Step 4: Go to Studio > Mix Console (F3)… and add the Spatial Mic Converter Plugin to the track as an insert.

You can now record enable the track and begin recording. From here you can enable track monitoring and see the meters move on the bus channel, the audio track, and the Spatial Mic Converter Plugin. This can help verify you have audio streaming from the mic.
Because we chose the output of our track to be stereo, Cubase Pro automatically added the VST AmbiDecoder to the Ambisonics track. The VST AmbiDecoder plug-in decodes Ambisonics audio for monitoring on your headphones or loudspeaker system. To make adjustments to this plugin double click on the track’s channel panner. There you can change the output type, select different HRTF’s, enable head tracking, and more. If you are using the virtual mic output section of the Spatial Mic Converter plugin be sure to bypass the VST AmbiDecoder to get the proper audio output format. More information about using 3rd party Binaural Decoders can be found on the Steinberg website in the user manual.

Happy recording and exploring the many options available as you record in 3D!